In a nutshell
- 🔆 How it works: Aluminium foil’s high reflectivity bounces short-wave solar radiation, cutting solar heat gain at windows and easing room temperatures without AC.
- 🛠️ Installation tips: Fit foil shiny side out on a backing with a 1–2 cm air gap, secure with low-tack tape, and keep it reversible for renters and easy removal.
- ⚠️ Safety and myths: Foil is non-combustible; avoid exterior mounting and fully sealed edges to reduce condensation. Don’t block trickle vents or escape routes; minimal impact on Wi‑Fi.
- 💷 Cost and results: Materials cost roughly £10–£15 for several windows, delivering about 1–3°C cooler rooms at peak sun when paired with good ventilation and blinds.
- 🌙 Smart routine: Target south- and west-facing windows, reflect by day, and flush by night with cross-breezes; remove panels at dusk to restore daylight and airflow.
Britain’s homes weren’t built for Saharan spikes. Loft bedrooms bake, south-facing lounges turn into greenhouses, and the fan only stirs hot air. A quirky fix is making the rounds: lining windows with everyday kitchen foil. It sounds improvised, but the physics are solid. Aluminium reflects solar energy, slashing the radiant heat pouring through glass. It’s cheap, reversible, and renter-friendly. Used with smart ventilation, the effect feels immediate near sunlit panes. Done correctly, this simple hack can ease room temperatures without touching the thermostat. Here’s how it works, what to watch for, and how to fit it safely in a typical UK flat or terrace.
How the Tinfoil Method Works
Sunlight carries short-wave radiation. When it strikes floors and furniture, that energy converts to heat and reradiates as long-wave infrared. Ordinary glass admits most of the first and impedes much of the second, which is why rooms warm quickly. Aluminium foil has very high reflectivity for visible and near-infrared light, bouncing a large share of that energy back out before it can be absorbed. In practice, this reduces solar heat gain at the window, the hottest surface in the room. Less absorbed sunlight equals less indoor heat build-up. The result is a cooler window zone and more stable room temperatures, especially during the afternoon peak.
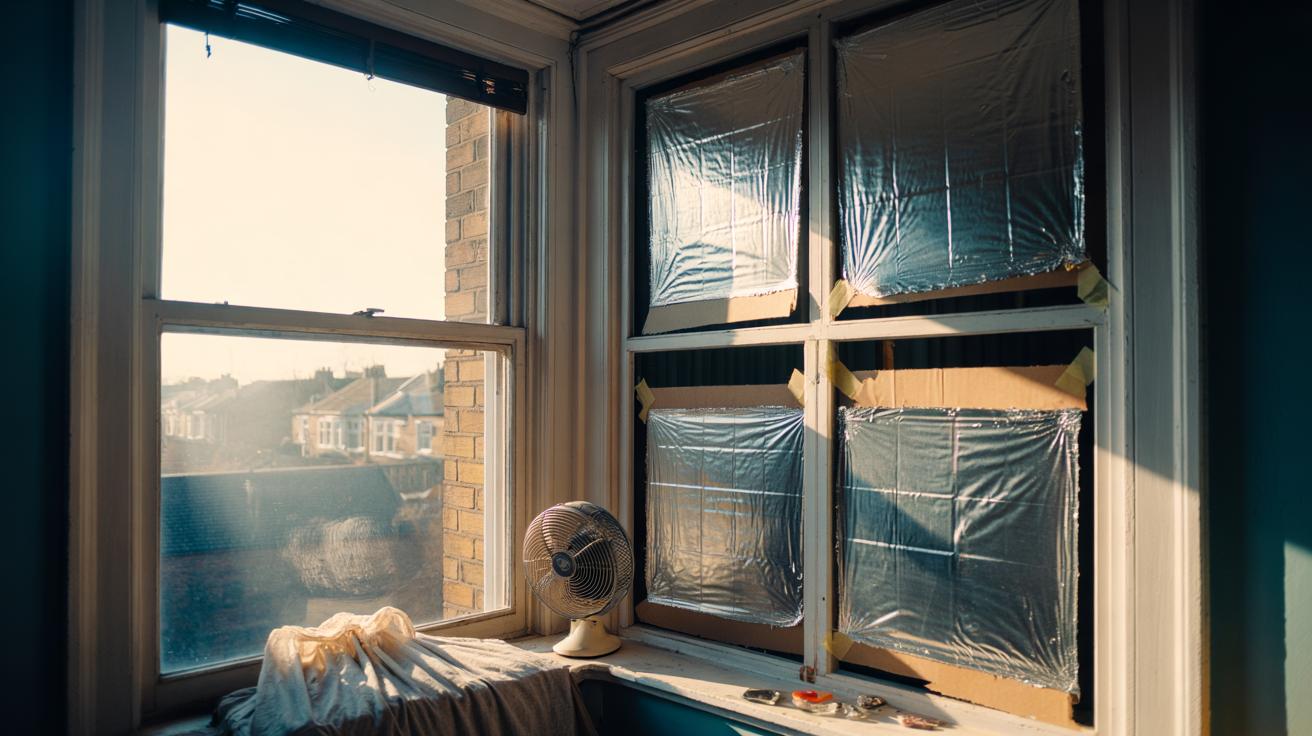
Placement matters. Pressed directly onto hot glass, foil can conduct heat inward along contact points. A small air gap—just a centimetre or two—improves performance by cutting conduction. The ideal: mount foil on a lightweight backing (cardboard or coroplast) and position it just inside the frame. South- and west-facing windows deliver the most benefit because they receive the fiercest sun. East windows help in the morning rush. North windows rarely need it in the UK.
Expect the most noticeable effect to be local. You’ll feel it first at the sofa, desk or bed hit by sunbeams. Combine with night purging—opening windows when outdoor air cools—and you create a daily cycle: reflect by day, flush by night. That pairing is where the real comfort gains add up.
Step-By-Step: Installing Foil for Maximum Effect
Start with the right kit. You’ll need standard kitchen foil, low-tack painter’s tape or reusable suction hooks, scissors, and a backing panel if you want a neater, removable insert. Measure the glazed area you plan to cover. Covering the upper two-thirds of the pane blocks the hottest rays while preserving some daylight. If glare is your main complaint, a narrow strip at the top can work wonders.
Build the insert. Wrap foil shiny side outward around a cut-to-size panel, smoothing wrinkles but not obsessing; the reflective property remains high. Tape the foil edges at the back. Fit felt pads or small foam spacers at the corners so the insert sits proud of the glass, maintaining that crucial air gap. Secure it inside the reveal with painter’s tape tabs or a couple of suction cups on the frame, not the glass. Don’t seal the window entirely; leave routes for natural ventilation and emergency egress.
For renters, keep it reversible. Use tape that lifts cleanly, or wedge an insert behind the blind. Avoid metal contact with live cables or sockets near inward-opening windows. Wipe the glass first; dust reduces adhesion and can scratch. In multi-pane sashes, smaller inserts are easier to handle and look tidier. Label each insert so you can pop it back in place during the next heatwave in seconds. When the sun moves off, slide out a panel to restore daylight and cross-breeze.
Safety, Myths, and What Experts Say
Let’s dispatch a few myths. Foil on a window does not ignite from sunlight; aluminium is non-combustible. The real issues are thermal stress, condensation, and poor installation. With double glazing, dark, absorptive films can sometimes raise glass temperatures unevenly. Foil is reflective, not absorptive, and when used with an air gap and not fully sealed edge-to-edge, the risk is low. Still, avoid exterior mounting on exposed panes, which can suffer wind damage and void warranties.
Condensation is another watch-out. If you create an airtight pocket, moisture from the room can fog the glass and encourage mould on frames. Keep a small gap at the sides or remove panels overnight. Don’t block trickle vents or fire escape routes. If you live in a conservation area or managed block, check any facade rules before altering street-facing appearance, though internal, removable inserts rarely breach guidance.
What about signals? Continuous foil wraps can attenuate Wi‑Fi and mobile reception, but a few panels won’t turn your lounge into a Faraday cage. On balance, building physicists will tell you the principle is sound: reflect the short-wave solar load before it becomes indoor heat. For a durable option, consider certified low-e reflective films or external shading, yet the kitchen-foil approach remains a valid stopgap during extreme heat, especially for students, renters, and households on tight budgets.
Cost and Performance: What You Can Expect
Outlay is tiny. A 20-metre roll of foil, painter’s tape, and cardboard offcuts can outfit several windows for under £10–£15. The gains aren’t magical, but they are tangible. Near a sun-blasted pane, radiant temperature can drop dramatically, cutting that burning-on-the-skin sensation. Across a small room, expect a modest but meaningful shift, especially when paired with overnight cooling. Think comfort, not refrigeration. Fans become more effective too, because they’re no longer pushing air superheated by direct sun.
| Setup | Materials | Estimated Cost | Expected Benefit | Notes |
|---|---|---|---|---|
| Upper-pane insert | Foil + card + tape | £3–£5 per window | Lower glare; cooler seating area | Best on south/west aspects |
| Full-pane insert | Foil + card + spacers | £4–£6 per window | Stronger heat reduction | Reduces daylight; remove at dusk |
| Strip visor | Narrow foil band | £1–£2 per window | Stops high sun glare | Minimal visual change |
| Reflective film (alt.) | Low‑e film | £25–£60 per kit | Durable, neater finish | Check glass warranty |
Typical outcomes in UK trials and household reports suggest 1–3°C lower room temperatures during peak sun with good ventilation, and far higher comfort near the window itself. Heatwaves vary, houses differ, so treat these as directional. Keep blinds or curtains drawn over the foil to improve aesthetics and add another thermal layer. When evening cools, remove or tilt the insert and purge heat with a cross-draft. It’s the daily rhythm that locks in results.
For a nation of brick walls and modest eaves, the tinfoil trick offers a timely, thrifty shield against swelter. It’s not a substitute for insulation, shading canopies, or efficient ventilation, but it buys relief when you need it fast. Try one room, observe the pattern of light, and refine. Stash the panels for the next hot spell. Small, reversible changes can stack into serious comfort. As temperatures climb each summer, what’s your plan to combine reflection by day and cool-air flushing by night in your own home?
Did you like it?4.6/5 (21)