In a nutshell
- 🔬 Why vinegar works: acetic acid dissolves mineral films (calcium carbonate, metal oxides) and improves wetting, but it won’t reverse oxidised UV hardcoat or yellowed polycarbonate.
- ⚡ 3-minute method: Work on a cool lens; use 1:1 vinegar:water (or 1:2), allow a 60–90s dwell time, wipe lightly, rinse thoroughly, dry, then apply a UV protectant.
- 🧪 Mixture guidance: Stronger mixes tackle heavy scale; milder ratios suit maintenance; spot-treat with neat vinegar briefly—keep contact short to protect coatings.
- 🛡️ Safety and limits: Test a corner, avoid mixing chemicals, keep runoff off paint and trims; true oxidation needs abrasive polishing or a restoration kit, not just vinegar.
- 🚗 Results and upkeep: Expect sharper beams and clearer lenses fast; finish with a headlight sealant or ceramic topper to preserve clarity and slow re-soiling.
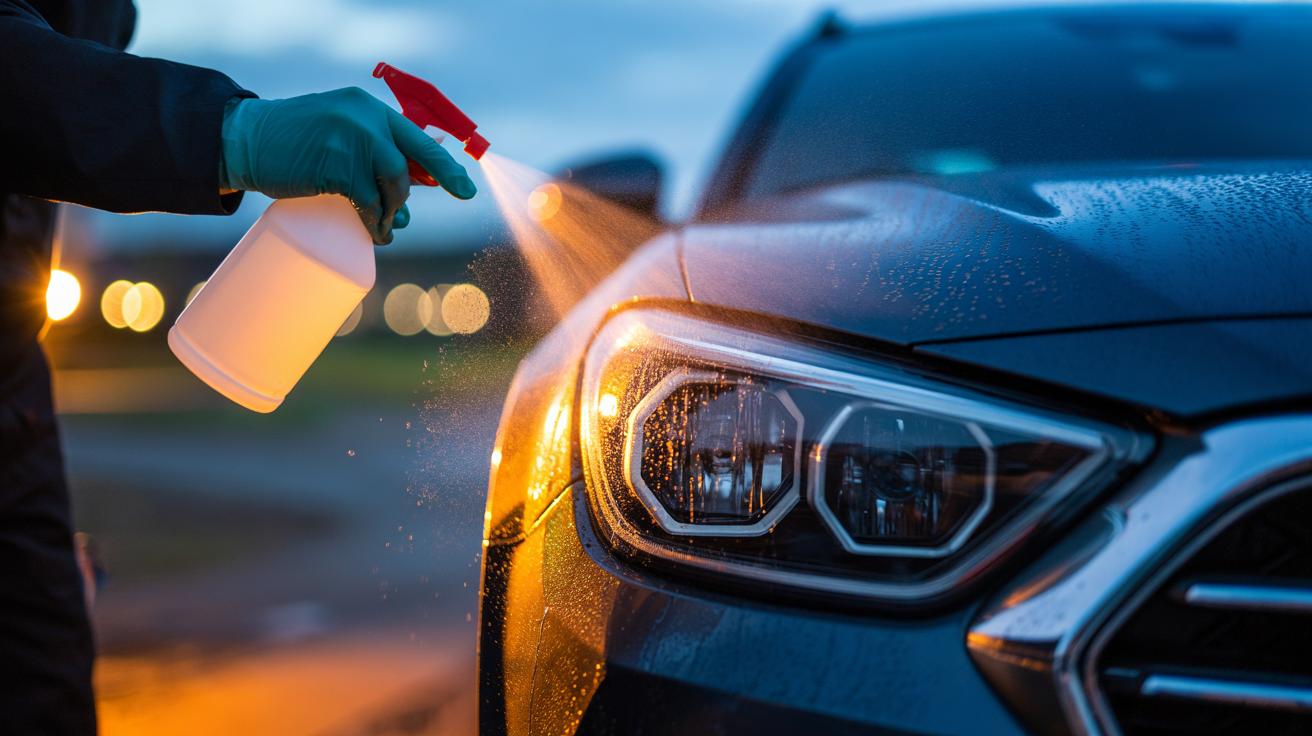
Cloudy headlight covers steal light, drain confidence, and make a car look older than its logbook suggests. There is, however, a quick fix hiding in the kitchen. A splash of household vinegar, rich in acetic acid, can dissolve the mineral films and gritty road grime that dull plastic lenses. In minutes, a simple rinse can restore clarity without abrasives or expensive kits. The trick lies in letting the acid do the work while you watch the clock. No gimmicks. Just chemistry. Here’s how a fast vinegar treatment cuts through haze, why it works, and the limits you should respect to keep your lenses bright and your polycarbonate safe.
Why Vinegar Works on Headlight Haze
Most “foggy” lenses are not truly scratched to oblivion; they’re filmed. Spray from wet roads leaves calcium carbonate and magnesium salts. Exhaust produces metal oxides. Summer bugs and winter grit cook into a tenacious organic layer. Acetic acid, the active ingredient in vinegar, is a weak acid with a strong affinity for alkaline deposits. It protonates carbonates and oxides, turning chalky scale into soluble salts you can rinse away. That’s why the headlight looks brighter after a quick wash with vinegar, even before you reach for polish.
There’s also a surface-tension bonus. Vinegar’s lower pH and small organic molecules help wet the lens, creeping into micro-pits where tap water beads and stalls. The result is a faster breakup of the film and fewer “stuck” halos that scatter light at night. Still, chemistry has boundaries. If the lens has yellowed throughout the polycarbonate matrix or the UV hardcoat is oxidised, decontamination alone cannot reverse the optical damage. Vinegar removes what sits on the lens; it cannot un-age the lens itself. Knowing the difference saves time and prevents overdoing it.
Step-by-Step: The 3-Minute Vinegar Rinse
Work on a cool lens, out of direct sun. Mix a fresh solution: 1:1 white vinegar to water for heavy haze, or 1:2 for maintenance. Saturate a clean microfibre with the solution and flood the lens. Don’t scrub yet. Let it dwell for 60–90 seconds while the acid chelates mineral scale. Keep it wet; reapply if necessary. Wipe in overlapping straight lines, light pressure only. Rinse thoroughly with clean water to neutralise residue. Dry with a second microfibre and inspect. If haze persists, repeat once. Then seal the clean surface with a UV protectant or wax to slow re-soiling.
Time is your guardrail: short contact cleans; long soaks risk softening old coatings. Avoid paper towels that can etch with wood fibres. Don’t mix vinegar with bleach-based cleaners. If road tar or oxidised traffic film lingers, spot-treat with a citrus-safe tar remover before the rinse, then repeat the acid step. Most drivers see a visible jump in clarity within three minutes. Night beams sharpen. Edges snap back. It feels like replacing bulbs, but you’ve simply freed light that haze was stealing.
| Mixture | Dwell Time | Expected Effect | Notes |
|---|---|---|---|
| 1:1 vinegar:water | 60–90 sec | Removes heavy mineral film | Do not exceed 2 minutes per pass |
| 1:2 vinegar:water | 45–60 sec | General refresh, maintenance | Safe monthly on coated lenses |
| Neat vinegar (spot) | 30–45 sec | Stubborn scale spots | Rinse immediately, re-seal after |
Safety, Limits, and When to Try Something Else
Headlight covers are usually polycarbonate with a thin UV hardcoat. That coating protects against sunlight but can oxidise and go matte. Vinegar will not fix a failing hardcoat; it can only strip the chalky contamination riding on top. If you see yellowing throughout the plastic or a uniform matte bloom that returns right after drying, you’re dealing with oxidation, not dirt. At that point, you need a light abrasive polish or a full restoration kit that sands, refines, and re-seals with a UV-stable clear.
Use common sense. Test a small corner first. Keep vinegar off fresh paint and bare metal, and rinse wiper arms or rubber trims that catch runoff. Wear gloves if you have sensitive skin. Never combine acids with alkaline wheel cleaners in a single step; neutralise and rinse between products. After a successful rinse, lock in the clarity with a dedicated headlight sealant or ceramic topper. That barrier slows oxidation and makes future cleans faster. Done right, the vinegar rinse becomes a quick pre-wash ritual, preventing the slow creep of haze that makes even premium bulbs underperform.
In short, a quick vinegar rinse is a fast, frugal way to reclaim lost lumens by dissolving the mineral veil that scatters your beams. It’s a targeted clean, not a cure-all, and respecting contact time keeps your coatings safe. Pair it with a proper sealant and the results last longer than a single commute. If you try it once and see an instant pop in clarity, you’ll likely add it to your seasonal wash routine. Ready to give your headlights three minutes and see how much brightness you’ve been missing?
Did you like it?4.4/5 (29)